

How To Repair Gas Grill
How to Fix a Gas Grill
Broken BBQ? No problem! Rescue your former, broken grill in v like shooting fish in a barrel steps.

Salve that beat-up, broken gas grill from the garbage dump and restore it to new condition for a fraction of the cost of a new grill. Near every office on barbecue grills can exist replaced, restored or repainted at relatively low cost, putting your grill back in use for many more seasons.
You lot might also like: TBD
- Time
- Complication
- Price
- A full 24-hour interval
- Beginner
- $51–100
Stride 1: Remove the cooking grate and rock grate
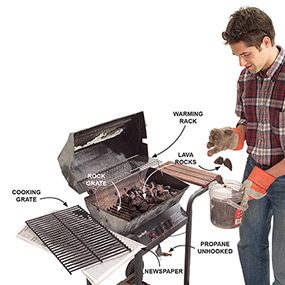
Photo 1: Remove the grate and rocks
Lift off the cooking grate and set it aside on newspaper. Scoop the lava rocks or ceramic briquettes into a saucepan.
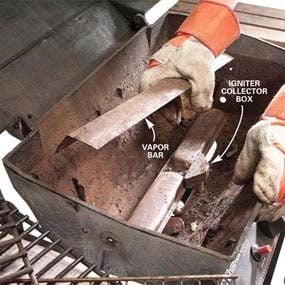
Photo 2: Remove the flame bar
Pull out the stone grate and set it aside. Lift off the vapor bar or flame spreader. Remove any lava rocks or briquettes that have fallen through the rock grate.
Renovating a grill involves three steps. You clean grease and grime off the gas grill. Repaint oxidized and faded parts with high-temp pigment, and replace worn-out parts (get replacement parts at most home centers). Your grill may non look exactly similar the one nosotros show in the photos, but the components will be similar.
Start past removing the cooking grate, warming rack and lava rocks as shown in Photo 1. If the lava rocks are more than than a year one-time or saturated with grease, supplant them with new lava rocks or ceramic briquettes. The rock grate holds the lava rocks or briquettes to a higher place the burner. Under the stone grate there will be either a vapor bar or flame spreader, which protects the burner from dripping grease. Remove the rock grate and expose the burner equally shown in Photo 2. The burner will be held in identify with screws or retaining clips hooked into the venturi tubes.
Caution!
Before doing any work on a broken BBQ, disconnect the gas supply or propane tank, and wear gloves to protect your hands from incredibly dirty grease stains.
Step 2: Test the igniter
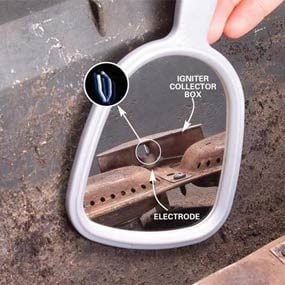
Photo 3: Check the igniter
Hold a mirror behind the igniter collector box and push the igniter button several times. If y'all see a spark, the igniter is good. If non, replace it (Photo 5).

Photograph 4: Unhook igniter wire
Pull the igniter wire off the end of the igniter button. Unhook the burner retaining springs from the venturi tube holes with a pliers.
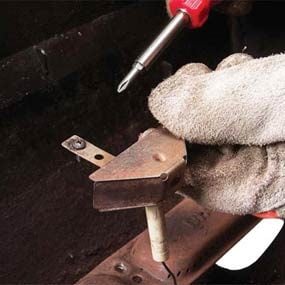
Photo v: Remove the igniter associates
Unscrew the igniter collector box from the burner. Pull out the collector box, electrode and igniter wire and set aside.

Photo vi: Remove the igniter button
Remove the igniter push. Either squeeze the igniter retaining clips together, or remove the retaining nut, and push the igniter complimentary from the control panel.
Adjacent, test the igniter electrode for a spark (Photograph three). When you push the igniter push, the electrode in the collector box sparks and ignites the gas. If the igniter wire sheathing has worn off, cover the exposed spots with electrical tape and retest. Nearly igniters fail because the spark never makes it to the electrode. If the igniter doesn't work, supervene upon the entire igniter assembly. Photo 4 shows how to disconnect the igniter wire and remove the retaining clips from the venturi tubes, which behave gas from the control console to the burners. Remove the igniter collector box from the burner (Photo five) and the igniter button (Photograph half-dozen) from the command panel.
Footstep 3: Remove and clean the burner assembly
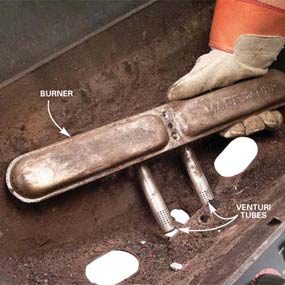
Photo 7: Remove the burner
Pull out the burner, sliding the venturi tubes gratuitous from their mounting slots. If the burner has heavy rust or is rusted through, replace information technology.
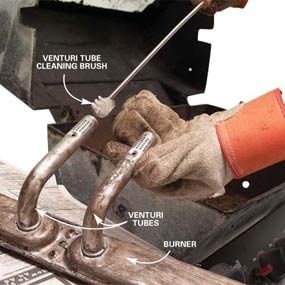
Photo 8: Make clean the venturi tubes
Push button a venturi cleaning castor or big pipe cleaner into the finish of the venturi tubes to make clean out spider webs (a common obstruction) and other debris.
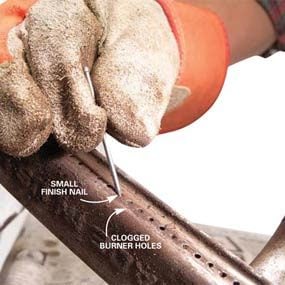
Photo ix: Poke open clogged burner holes
Open up clogged burner holes with a small-scale wire or finish nail, and scrub the burner make clean with a wire brush if it's dirty or rusty.
The burner assembly is the middle of the grill. Remove and make clean information technology every bit shown in Photos 7 – nine. If the burner or venturi tubes have excessive rust and the burner holes are rusted through, replace the burner associates. These assemblies tin be expensive.
Step four: Scrub the charcoal-broil grill trunk
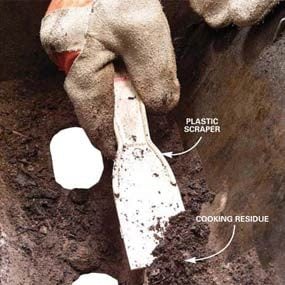
Photo 10: Scrape the interior
Loosen cooking buildup from the grill hood and body with a plastic putty knife. Scrub the inside of the grill with soap and water.
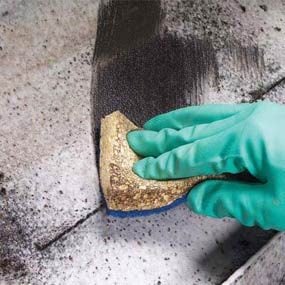
Photo 11: Scrub the interior
Remove stubborn interior buildup with an oven or grill cleaner. Work exterior and then you don't breathe the cleaner fumes.
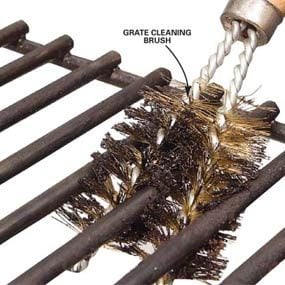
Photo 12: Scrub the cooking grate
Scrape the cooking grate with a wire castor or grate cleaning brush. Soak the grate with oven cleaner to remove stubborn buildup.
One time you pull out all the parts, remove grease buildup from the body (Photo 10). Remove stubborn grease film with an oven or grill cleaner (Photo eleven). Clean the viewing glass with a drinking glass cleaner. Dislodge buildup from the cooking grate with a wire brush or the special grill cleaning castor shown in Photo 12.
Degrease and Sand Before Painting
Spread degreaser inside the cover and burner area and over the entire exterior. Then scrub the entire grill with a brush. Make sure you remove grease from all the crevices. If you take a power washer, soak the grill with degreaser and and then nail off the grease and loose paint. Rinse information technology with water and let it dry in the dominicus.
Sand pitted and corroded areas with 80-grit sandpaper. Employ a wire castor in the crevices to remove surface rust and chipping paint. So switch to 120-grit sandpaper and sand the entire grill and cart.
Footstep 5: Restore the wood slats
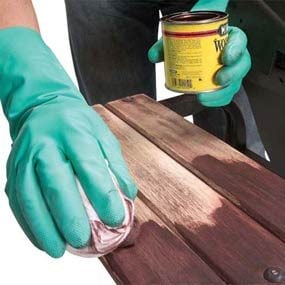
Photo 13: Refinish the woods
Sand the wood slats with 100-grit sandpaper. Stain the wood to restore the color and seal with Danish oil or linseed oil.
Scrub down the wooden slats with sandpaper, and recoat them with a matching stain (Photo 13).
Paint the grill
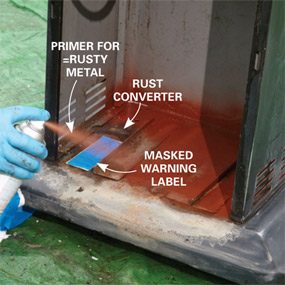
Spray on primer
Apply rust converter, so spray primer over the converted rust and bare metal areas. Let information technology "wink" for the recommended time. Then apply a 2d coat.
Apply the finish coat
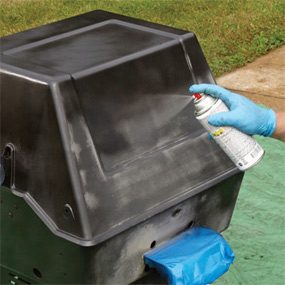
Paint the summit of the grill lid first. And so spray downward each side all the style to the bottom of the cart. Pigment the forepart of the grill last. Employ a second coat after waiting the recommended fourth dimension.
After sanding, wipe the unabridged grill with a tack cloth. Pretreat the worst rust spots with a rust converter product. Once that dries, prime the rusty areas and bare metallic with a primer for rusty metal. Allow the primer dry. And so spray-paint it. Permit the paint dry for the recommended time. Then install the burners and grates and any replacement parts and become grilling.
Required Tools for this Project
Have the necessary tools for this DIY project lined up before y'all start—y'all'll save time and frustration.
Required Materials for this Project
Avoid last-infinitesimal shopping trips past having all your materials ready ahead of fourth dimension. Hither's a list.

Source: https://www.familyhandyman.com/project/how-to-fix-a-gas-grill/
Posted by: wileycomplem.blogspot.com
0 Response to "How To Repair Gas Grill"
Post a Comment